Blog and Tutorials
How to Connect DS3231 RTC Module to Arduino: Complete Guide

As an Arduino enthusiast and electronics instructor, I’ve found that accurate timekeeping can make or break many DIY projects. Over the years, I’ve seen students struggle with timing issues that could have been easily solved with a proper Real-Time Clock (RTC) module.
The DS3231 RTC module is one of the most accurate and reliable RTC modules available for Arduino projects. Unlike Arduino’s built-in timekeeping functions, which can drift significantly, the DS3231 maintains precise time even when your Arduino loses power, thanks to its backup battery and temperature-compensated crystal oscillator.
In this guide, I’ll walk you through everything you need to know about connecting and using the DS3231 RTC module with an Arduino board, based on my experience implementing this in numerous projects.
Table of Contents
What is the DS3231 RTC Module?
The DS3231 is a precision Real-Time Clock (RTC) module that keeps track of hours, minutes, seconds, days, months, and years with leap year compensation. It offers:
- Accuracy of ±2ppm from -40°C to +85°C (equivalent to just 1 minute of error per year)
- Battery backup for continuous timekeeping
- I²C interface for easy communication with microcontrollers
- 32.768 kHz output for peripheral devices
- Two programmable alarms
- Temperature sensor with ±3°C accuracy
During a recent workshop demonstration at DIYgh TECH HUB, I was impressed when a DS3231 module that had been unplugged for over six months still maintained the correct time within a few minutes of accuracy. This level of precision is essential for data logging projects, irrigation systems, or any application requiring consistent timekeeping.
Components Needed
For this DS3231 RTC module with Arduino tutorial, you’ll need:
- Arduino board (Uno, Nano, Mega, etc.)
- DS3231 RTC module (often comes with CR2032 battery)
- Jumper wires (male-to-male or male-to-female depending on your module)
- Breadboard (optional, for testing)
- USB cable for Arduino programming
Wiring the DS3231 to Arduino
The DS3231 module communicates with Arduino using the I²C protocol, which requires just two data pins plus power and ground. Here’s how to connect it:
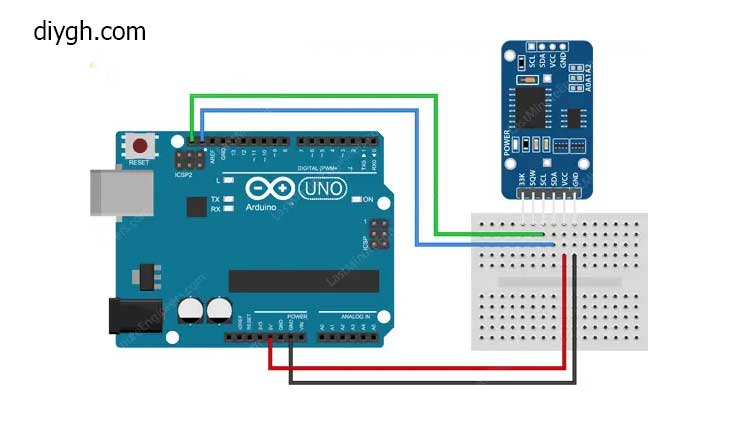
| DS3231 Pin | Arduino Pin |
|---|---|
| VCC | 5V or 3.3V |
| GND | GND |
| SDA | A4 (Uno/Nano) or pin 20 (Mega) |
| SCL | A5 (Uno/Nano) or pin 21 (Mega) |
If your DS3231 RTC module has additional pins like SQW (square wave output) or 32K, you can leave these unconnected for basic functionality.
I prefer powering the module from the 5V pin on Arduino Uno and Mega boards, as I’ve found it provides more stable operation. For Arduino Pro Mini or other 3.3V boards, use the 3.3V pin instead.
Installing Required Libraries for the DS3231 RTC Module
Before we can program the DS3231 RTC module, we need to install the RTClib library:
- Open the Arduino IDE
- Go to Sketch > Include Library > Manage Libraries
- Search for “RTClib”
- Find the library by Adafruit and click Install
The RTClib library supports multiple RTC modules, including the DS3231, and provides easy-to-use functions for setting and retrieving time.
Basic Code Example: Reading Time from DS3231
Here’s a simple sketch to read and display the current time from your DS3231 RTC module:
#include <Wire.h>
#include <RTClib.h>

RTC_DS3231 rtc;

void setup() {
  Serial.begin(9600);

  if (!rtc.begin()) {
    Serial.println("Couldn't find RTC");
    while (1);
  }

  // Uncomment this line to set the RTC to the date & time this sketch was compiled
  // rtc.adjust(DateTime(F(__DATE__), F(__TIME__)));
}

void loop() {
  DateTime now = rtc.now();

  Serial.print(now.year(), DEC);
  Serial.print('/');
  Serial.print(now.month(), DEC);
  Serial.print('/');
  Serial.print(now.day(), DEC);
  Serial.print(' ');
  Serial.print(now.hour(), DEC);
  Serial.print(':');
  Serial.print(now.minute(), DEC);
  Serial.print(':');
  Serial.print(now.second(), DEC);
  Serial.println();

  Serial.print("Temperature: ");
  Serial.print(rtc.getTemperature());
  Serial.println(" C");

  delay(1000);
}
When you run this code, you should see the current date, time, and temperature readings in the Serial Monitor. If the time is incorrect, uncomment the rtc.adjust() line in the setup() function, upload the sketch once to set the correct time, then recomment the line and upload again.
Setting the Time on the DS3231
On several occasions, students often ask, “How do I set the correct time on the module?” Here are three methods I recommend:
Method 1: Using Compilation Time
rtc.adjust(DateTime(F(__DATE__), F(__TIME__)));
This sets the RTC to the time when your sketch was compiled. While convenient, there might be a slight delay between compilation and when the code runs.
Method 2: Setting a Specific Time Manually
rtc.adjust(DateTime(2025, 4, 2, 15, 30, 0)); // Year, Month, Day, Hour, Minute, Second
This allows you to set a specific time of your choosing.
Method 3: Using Serial Input
For a more interactive approach, you can create a function that prompts users to input the date and time via the Serial Monitor:
void setTimeFromSerial() {
  Serial.println("Enter the current date and time in the format: YYYY MM DD HH MM SS");

  while (!Serial.available()) {
    // Wait for input
  }

  if (Serial.available()) {
    int year = Serial.parseInt();
    int month = Serial.parseInt();
    int day = Serial.parseInt();
    int hour = Serial.parseInt();
    int minute = Serial.parseInt();
    int second = Serial.parseInt();

    rtc.adjust(DateTime(year, month, day, hour, minute, second));
    Serial.println("Time set successfully!");
  }
}
Creating a Digital Clock Display
Now that we have our RTC module working, let’s create a more practical application. Here’s how to build a simple digital clock display:
#include <Wire.h>
#include <RTClib.h>
#include <LiquidCrystal_I2C.h>  // If using an I2C LCD

RTC_DS3231 rtc;
LiquidCrystal_I2C lcd(0x27, 16, 2);  // Set the LCD address to 0x27 for a 16x2 display

void setup() {
  lcd.init();
  lcd.backlight();

  if (!rtc.begin()) {
    lcd.print("RTC not found!");
    while (1);
  }

  // Uncomment once to set time
  // rtc.adjust(DateTime(F(__DATE__), F(__TIME__)));
}

void loop() {
  DateTime now = rtc.now();

  lcd.setCursor(0, 0);

  // Date display
  lcd.print(now.year(), DEC);
  lcd.print('/');
  if (now.month() < 10) lcd.print('0');
  lcd.print(now.month(), DEC);
  lcd.print('/');
  if (now.day() < 10) lcd.print('0');
  lcd.print(now.day(), DEC);

  // Time display
  lcd.setCursor(0, 1);
  if (now.hour() < 10) lcd.print('0');
  lcd.print(now.hour(), DEC);
  lcd.print(':');
  if (now.minute() < 10) lcd.print('0');
  lcd.print(now.minute(), DEC);
  lcd.print(':');
  if (now.second() < 10) lcd.print('0');
  lcd.print(now.second(), DEC);

  delay(1000);
}
This code creates a digital clock on an I2C LCD display, showing the date on the top line and the time on the bottom line.
Using the DS3231 Alarm Functions
One of the most useful features of the DS3231 is its built-in alarm functionality. Here’s a simple example of how to set and use an alarm:
#include <Wire.h>
#include <RTClib.h>

RTC_DS3231 rtc;
const int alarmPin = 2;  // Arduino pin to connect to SQW pin on DS3231

void setup() {
  Serial.begin(9600);
  pinMode(alarmPin, INPUT_PULLUP);

  if (!rtc.begin()) {
    Serial.println("Couldn't find RTC");
    while (1);
  }

  // Clear any existing alarms
  rtc.disableAlarm(1);
  rtc.disableAlarm(2);
  rtc.clearAlarm(1);
  rtc.clearAlarm(2);

  // Set Alarm 1 to trigger at a specific time (every day at 7:00:00 AM)
  rtc.setAlarm1(DateTime(0, 0, 0, 7, 0, 0), DS3231_A1_Hour);

  // Configure SQW pin to be used as an alarm interrupt pin
  rtc.writeSqwPinMode(DS3231_OFF);
  rtc.enableAlarm(1, DS3231_ALARM1_MATCH_HOURS);
}

void loop() {
  DateTime now = rtc.now();

  Serial.print(now.hour(), DEC);
  Serial.print(':');
  Serial.print(now.minute(), DEC);
  Serial.print(':');
  Serial.print(now.second(), DEC);
  Serial.print(" - Alarm status: ");

  if (!digitalRead(alarmPin)) {
    Serial.println("TRIGGERED!");
    rtc.clearAlarm(1);
  } else {
    Serial.println("Waiting...");
  }

  delay(1000);
}
In my automated feeding system project, I used this alarm feature to trigger food dispensing for fish at precise times throughout the day. The reliability of the DS3231’s alarms ensured that feeding occurred exactly when scheduled.
Common Issues and Troubleshooting
Throughout my teaching career, I’ve encountered several common issues when working with the DS3231:
The RTC Is Not Detected
If your Arduino can’t find the DS3231 RTC module:
- Double-check your wiring connections, especially SDA and SCL pins
- Ensure the module has power (check for indicator LEDs)
- Try using different I²C addresses if available on your module
- Check if your DS3231 RTC module has pull-up resistors; if not, add 4.7k ohm resistors to SDA and SCL lines
Time Resets After Power Cycle
If the time resets when you disconnect power:
- Check if the backup battery is installed correctly
- Measure the battery voltage (should be at least 2.5V for a CR2032)
- Replace the battery if necessary
Inaccurate Readings
For inaccurate time or temperature readings:
- Keep the module away from heat sources
- Verify that your code is reading the values correctly
- Consider calibrating the temperature sensor if it’s consistently off
Advanced Applications
Now that you understand the basics, here are some practical projects you can build with the DS3231 RTC module:
- Data Logger: Records sensor readings with accurate timestamps
- Automated Irrigation System: Water plants at specific times
- Sunrise/Sunset Simulator: Program lights to fade in/out at specific times
- Automated Pet Feeder: Dispenses food at regular intervals
- Scheduled Power Controller: Turn devices on/off according to a schedule
During a recent workshop at DIYgh TECH HUB, a student created a fascinating sunrise alarm clock that gradually increased LED brightness starting 30 minutes before their alarm time. The DS3231’s precision ensured they woke up at exactly the right time every day.
Conclusion
The DS3231 RTC module is an essential component for any Arduino project requiring accurate timekeeping. Its ease of connection, precision, and reliability make it perfect for both beginners and advanced users. From simple clocks to complex scheduled systems, this tiny module can dramatically improve your project’s capabilities.
Having used this module in countless projects, I can attest to its durability and accuracy. The peace of mind that comes from knowing your project will keep accurate time even during power outages is invaluable.
Ready to add precise timekeeping to your Arduino projects? Visit DIYgh TECH HUB’s Arduino Components section to purchase your DS3231 RTC module today. If you need help implementing your project, put your request in the comment section or join one of our hands-on electronics workshops, where we cover RTC applications and many other exciting Arduino topics.
References: