Blog and Tutorials
How to Install ESP8266 NodeMCU Board in Arduino IDE 2.0 (The Easy Way)

The new Arduino IDE 2.0 is a major upgrade, offering a modern interface and powerful features. However, if you’re an ESP8266 user, you might have noticed that your favorite boards are missing by default. Don’t worry, getting your ESP8266 and NodeMCU boards working in Arduino IDE 2.0 is a simple process.
In this comprehensive guide, I will walk you through the exact steps to add ESP8266 boards (NodeMCU, WeMos D1, Mini, etc.) to the Arduino IDE 2.0. We’ll also cover how to upload your first sketch and troubleshoot common issues. By the end of this tutorial, you’ll be ready to start your next ESP8266 project with the latest and greatest Arduino IDE.
Table of Contents
Prerequisites
Before we begin, make sure you have the following:
- Arduino IDE 2.0 or 2.x installed: This guide is specifically for the new Arduino IDE. If you don’t have it yet, download it from the official Arduino website (Download the Arduino IDE 2.0).
- An ESP8266 Development Board: This can be a NodeMCU, a WEMOS D1 Mini, or any other ESP8266-based board.
- A Micro-USB Cable: Ensure your cable can handle data transfer, not just charging.
Kindly watch the video below if you prefer visual tutorial:
Step 1: Add the ESP8266 Boards Manager URL
The first step is to tell the Arduino IDE where to find the ESP8266 board definitions.
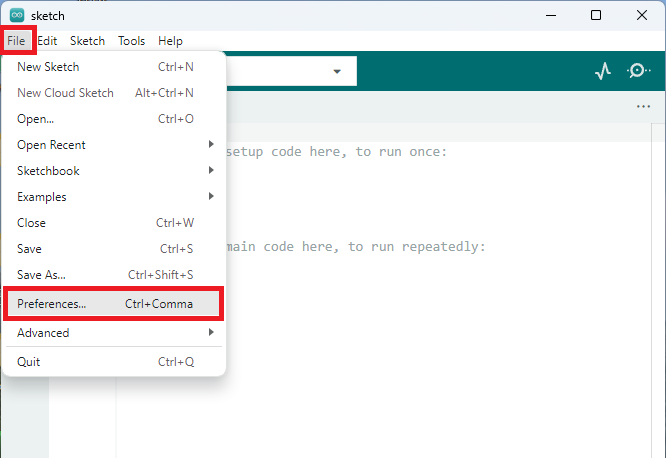
- Open your Arduino IDE 2.0.
- Go to File > Preferences (or Arduino IDE > Settings on Mac).
- In the “Additional Boards Manager URLs” field, copy and paste the following URL:
http://arduino.esp8266.com/stable/package_esp8266com_index.json
 3")
4. Click “OK” to save your changes.
Pro Tip: If you already have other URLs in this field, add a comma after the last one before pasting the new URL. For example, if you already have this link https://diygh.com. Just add a comma after the .com and paste the link above like this:
https://diygh.com,http://arduino.esp8266.com/stable/package_esp8266com_index.json
Step 2: Install ESP8266 Core in Boards Manager
Now that the Arduino IDE knows where to look, you can install the ESP8266 package.

- Open the Boards Manager by clicking the icon on the left sidebar or by navigating to Tools > Board > Boards Manager.
- In the search bar, type
esp8266. - You’ll see “esp8266 by ESP8266 Community”. Click the “Install” button. The latest version is recommended.
- The installation process will take a few moments. Once it’s complete, you can close the Boards Manager.
Step 3: Select Your ESP8266 Board
With the ESP8266 core installed, you can now select your specific board.
- Go to Tools > Board > ESP8266 Boards and a long list of ESP8266 boards will appear.
- Select the board you are using. For many, this will be the “NodeMCU 1.0 (ESP-12E Module)”.
- After selecting your board, go to Tools > Port and select the correct COM port for your device.
Step 4: Upload a Test Sketch to Your ESP8266
Let’s make sure everything is working by uploading a simple “Blink” sketch. This is the “Hello, World!” of microcontrollers.
- Go to File > Examples > 01.Basics > Blink. A new sketch will open.
- This sketch will blink the built-in LED on your ESP8266 board. The pin for the built-in LED is usually
LED_BUILTIN. - Click the “Upload” button (the arrow icon) in the top left corner.
- The Arduino IDE will compile the sketch and upload it to your board. You should see “Done uploading.” when it’s finished.
- Look at your ESP8266 board. The onboard LED should now be blinking!
Troubleshooting Common ESP8266 Issues
If you encounter errors, don’t panic. Here are some of the most common problems and their solutions:
- Error:
esptool.FatalError: Failed to connect to ESP8266: Timed out waiting for packet header- This is the most common error. It means the ESP8266 is not in flashing mode.
- Solution: Hold down the “BOOT” or “FLASH” button on your board, press and release the “RST” or “EN” button, and then release the “BOOT/FLASH” button. Then, try uploading again.
- Error:
COM Port not found/not available- Solution 1: Make sure you have the correct drivers installed for your board’s USB-to-serial chip (often CP2102 or CH340).
- Solution 2: Try a different USB cable. Some cables are for charging only and don’t support data transfer.
- Solution 3: Ensure you’ve selected the correct COM port under Tools > Port.
Bonus: Adding LittleFS Filesystem Support
If you want to store files on your ESP8266 (for web servers, data logging, etc.), you’ll need to install the LittleFS filesystem uploader.
- Go to the ESP8266 LittleFS Filesystem Uploader GitHub page.
- Follow the instructions in their “Installation” section to add the tool to your Arduino IDE.
- Once installed, you’ll have a new option under Tools > ESP8266 LittleFS Data Upload.
Conclusion
Congratulations! You have successfully configured the Arduino IDE 2.0 for ESP8266 development. You can now take advantage of the new IDE’s features while continuing to work with this powerful and affordable microcontroller.
What will you build with your ESP8266? Share your project ideas in the comments below! If you have any questions or run into any issues, feel free to ask for help. Happy coding!